Installing and upgrading
Running the production image
Section titled “Running the production image”Trying it out on this machine
Section titled “Trying it out on this machine”docker run -p 4173:4173 \ -e OTB_PUBLIC_URL=http://localhost:4173 \ -e OTB_SESSION_SECRET=$(openssl rand -hex 32) \ -v otb-works-data:/app/packages/server/data \ ghcr.io/outsidethebox-io/otb-works:latestThis command is for localhost and nothing else. As soon as other people
need to reach it, read Reaching it over the
network, and the server will make you, because
it refuses to start on an address where sign-in could not work.
Putting it on a network, with HTTPS
Section titled “Putting it on a network, with HTTPS”docker run -p 80:80 -p 443:443 \ -e OTB_PUBLIC_URL=https://works.example.com \ -e OTB_WORKS_TLS=auto \ -e OTB_WORKS_TLS_EMAIL=it@example.com \ -e OTB_SESSION_SECRET=$(openssl rand -hex 32) \ -v otb-works-data:/app/packages/server/data \ ghcr.io/outsidethebox-io/otb-works:latestThat is the whole thing: no proxy to install and no certificate to obtain. The same settings work in a Docker Compose file.
Then watch the log. On an instance that has no administrator yet, the server prints a first-run banner as the last thing it does:
  ┌──────────────────────────────────────────────────────────────────┐  │  OTB Works, first run                                           │  └──────────────────────────────────────────────────────────────────┘
  This instance has no administrator yet. Open the setup page and  paste the code below to create one:
      http://localhost:4173/setup
      Setup code:  7f3a…
Open that address, paste the code, and the setup wizard walks you through
creating the administrator, installing a licence, telling the instance about
your programme, and wiring up email. It ends on Home, ready to use. If you
started the container detached, docker logs <container> shows the same
banner.
The two variables that are not optional
Section titled “The two variables that are not optional”OTB_PUBLIC_URL is the address people will actually reach this instance
on, including the scheme and any port, with no trailing slash, not
necessarily localhost. Behind a reverse proxy on a real hostname it is
https://works.example.com. It scopes sign-in cookies, derives the passkey
domain, and builds the links in invitation and password-reset emails, so an
instance started with the wrong value will appear to work and then send people
links that go nowhere. The server refuses to start without it and says exactly
what to set.
OTB_SESSION_SECRET is not optional either, on purpose, so a default dev
secret can never quietly end up in production.
Reaching it over the network
Section titled “Reaching it over the network”An instance other people reach has to be on HTTPS. Not as good practice ,
it will not work otherwise. Sign-in uses a cookie marked Secure, and a
browser discards a Secure cookie sent over plain HTTP to anything but
localhost. On http://192.168.1.50:4173 your colleagues would reach the
sign-in page, type a correct password, and be returned to the sign-in page,
every time, with nothing in the server log to explain it.
So the server refuses to start on a plain-HTTP address that is not localhost, and tells you which of the three answers below you want. It is better to find this out at the terminal than from a colleague on Monday.
OTB_WORKS_TLS is the whole decision:
| What it does | What it needs | |
|---|---|---|
auto |
This container gets a real certificate from Let’s Encrypt for your hostname and serves HTTPS itself | The name in OTB_PUBLIC_URL resolving in public DNS, and ports 80 and 443 reachable from the internet |
internal |
This container serves HTTPS with a certificate from its own certificate authority | Nothing. Works on a LAN, a private hostname or a bare IP, with no public DNS and no inbound internet, but you install its CA root on the machines that connect |
off |
Nothing in this container terminates TLS; the app listens on 0.0.0.0:4173 for your own proxy |
Traefik, nginx, F5, an ingress controller, something you already run, plus OTB_TRUSTED_PROXIES |
Left unset it is chosen for you, from what you have already told the
instance: off for a localhost address, off if OTB_TRUSTED_PROXIES says
something is already in front, internal for a bare IP address, and auto for
a real hostname. The boot log always states the mode and why, so you can
check the posture you meant is the posture you got.
auto, a real hostname, nothing else to install
Section titled “auto, a real hostname, nothing else to install”docker run -p 80:80 -p 443:443 \ -e OTB_PUBLIC_URL=https://works.example.com \ -e OTB_WORKS_TLS=auto \ -e OTB_WORKS_TLS_EMAIL=it@example.com \ -e OTB_SESSION_SECRET=$(openssl rand -hex 32) \ -v otb-works-data:/app/packages/server/data \ ghcr.io/outsidethebox-io/otb-works:latestPublish port 80 as well as 443. Port 80 is where the certificate challenge arrives; a deployment that publishes only 443 never gets a certificate.
OTB_WORKS_TLS_EMAIL is optional and worth setting, it is where Let’s Encrypt
emails you about expiring certificates, and nothing else uses it.
If the name does not resolve, the server says so at boot and names the alternatives, rather than retrying in silence. If it resolves but the challenge cannot complete, a firewall, CGNAT, a tunnel that does not forward port 80 , the instance says “still waiting” every 30 seconds and then stops after five minutes with a list of what is usually wrong. It never sits there looking healthy while serving nothing.
Keep the data volume. Let’s Encrypt allows five certificates per domain per week, and the certificate store lives on that volume. Losing it repeatedly during setup can lock you out for a week.
internal, a LAN, no public DNS
Section titled “internal, a LAN, no public DNS”docker run -p 443:443 \ -e OTB_PUBLIC_URL=https://works.internal.example \ -e OTB_WORKS_TLS=internal \ -e OTB_SESSION_SECRET=$(openssl rand -hex 32) \ -v otb-works-data:/app/packages/server/data \ ghcr.io/outsidethebox-io/otb-works:latestWorks with a private hostname, a name only your own DNS knows, or a bare IP
address (https://192.168.1.50), nothing needs to resolve publicly and
nothing needs to reach this machine from the internet.
One step you cannot skip: the certificate is signed by this container’s own certificate authority, which nothing trusts yet, so every browser will warn until you install that CA root on the machines that connect. The boot log prints its exact path on the data volume:
/app/packages/server/data/caddy/pki/authorities/local/root.crtCopy it off the volume and install it as a trusted root, by group policy, MDM, or by hand. It is stable across restarts and upgrades, so this is a one-off.
off, behind the proxy you already run
Section titled “off, behind the proxy you already run”docker run -p 127.0.0.1:4173:4173 \ -e OTB_PUBLIC_URL=https://works.example.com \ -e OTB_WORKS_TLS=off \ -e OTB_TRUSTED_PROXIES=uniquelocal \ -e OTB_SESSION_SECRET=$(openssl rand -hex 32) \ -v otb-works-data:/app/packages/server/data \ ghcr.io/outsidethebox-io/otb-works:latestOTB_PUBLIC_URL is the address people type, the proxy’s https://
address, not the container’s. Publish the container’s port only where your
proxy can reach it, and set OTB_TRUSTED_PROXIES (below) so the instance can
still tell one client from another.
What HSTS this instance sends
Section titled “What HSTS this instance sends”On a request that genuinely arrived over HTTPS, and only then:
Strict-Transport-Security: max-age=31536000. Deliberately without
includeSubDomains and without preload: this product occupies one name
inside your domain and has no business pinning mail.example.com, or any
other host you run, to HTTPS for a year. If you want those, set them at the
edge proxy that actually owns the domain.
Everything else
Section titled “Everything else”| Variable | What it is for |
|---|---|
OTB_WORKS_TLS |
auto, internal or off, see Reaching it over the network. Unset is derived from OTB_PUBLIC_URL and stated in the boot log. |
OTB_WORKS_TLS_EMAIL |
auto only, optional. Where Let’s Encrypt emails you about expiring certificates. |
OTB_TRUSTED_PROXIES |
Which upstream hops to believe about who the client is. See Behind a reverse proxy below. Unset means “nothing is in front of this instance”, except in auto/internal, where Caddy inside this same container is trusted automatically. |
OTB_NOTIFICATIONS_ENC_KEY |
Optional since 1.1.0, see below. Encrypts the stored SMTP/SES/ACS credential at rest. |
OTB_INTEGRATIONS_ENC_KEY |
Optional since 1.1.0. Encrypts the stored Jira/Azure DevOps API token. |
OTB_ADVISOR_ENC_KEY |
Optional since 1.1.0. Encrypts Advisor’s stored model-provider key. |
OTB_SSO_ENC_KEY |
Optional since 1.1.0. Encrypts a registered identity provider’s client secret. |
OTB_APP_NAME |
What an authenticator shows while enrolling a passkey. Defaults to “OTB Works”. |
OTB_UPDATE_FEED_URL |
Where the update check would look, if you switch it on. Defaults to OTB’s own feed; set it to point at a mirror you host. It cannot switch checking on, that is a decision made on Admin ▸ Updates, or in update-feed.json on the data volume. |
OTB_UPDATE_FEED_INTERVAL_MS |
How often to check, once on. Defaults to six hours. Anything under five minutes is honoured with a warning in the log, at that rate the requests look like a heartbeat rather than a repository poll. |
You no longer have to set the four *_ENC_KEY values
Section titled “You no longer have to set the four *_ENC_KEY values”Since 1.1.0 the instance generates its own on first boot and keeps them in
instance-keys.json on the data volume, owner-read/write only. Nothing needs
configuring: email, integrations, Advisor and SSO all work out of the box.
Before 1.1.0, each of these was an environment variable you had to invent, and each one silently disabled a whole feature until you did, which is exactly the kind of “licensed but quietly unavailable, with nothing on screen saying why” this release set out to remove.
They are deliberately four separate keys, generated separately: a Jira token, a model provider’s key, an SMTP password and an IdP client secret are rotated by different people on different schedules, and rotating one must never corrupt another.
Setting one anyway still works, and still wins. If you keep secrets in a secret manager, or you are standing an instance up against an existing data volume whose credentials were encrypted with a key you hold, set the variable and that is the key used, nothing is generated and your key is never written to the data volume. That override is deliberate and permanent: re-keying an instance whose stored credentials were encrypted with your key would lose every one of them.
Two things follow, and they matter for backups:
instance-keys.jsonis part of what you are backing up. It lives besideapp.dbon the data volume, and a backup of the database without it cannot decrypt a single stored credential.- It is deliberately NOT inside
app.db. A key held in the database whose rows it encrypts makes every copy of that database a copy of its own key, which defeats encrypting at rest at all.
Generate a key yourself, if you want to set one, with openssl rand -hex 32.
Setting up without a browser (automated and air-gapped deployments)
Section titled “Setting up without a browser (automated and air-gapped deployments)”If nobody is going to open a browser and paste a code, an unattended deploy, a pipeline, an air-gapped install driven entirely from a compose file, set both of these at boot instead:
docker run -p 4173:4173 \ -e OTB_PUBLIC_URL=https://works.example.com \ -e OTB_SESSION_SECRET=$(openssl rand -hex 32) \ -e OTB_SEED_ADMIN_EMAIL=admin@example.com \ -e OTB_SEED_ADMIN_PASSWORD='a properly long passphrase' \ -v otb-works-data:/app/packages/server/data \ ghcr.io/outsidethebox-io/otb-works:latestThe administrator is created on the first boot of an empty database, and only then: a restart with the same variables still set does nothing at all, never creates a second account, and never resets the existing one’s password. The log says which of those happened.
That password must be changed at first sign-in, and the server enforces it.
Anyone who can run docker inspect, read your compose file, or list processes
on the host can read a password set this way, that is a reasonable way to
bootstrap an instance and an unreasonable way to run one. Until it is replaced,
the account can do nothing except replace it; signing in takes you straight to
a screen that does exactly that, and the rest of the wizard follows.
The password must be at least 12 characters. A passphrase of a few words is both stronger and easier to type than a short one with symbols in it.
Behind a reverse proxy
Section titled “Behind a reverse proxy”This is the OTB_WORKS_TLS=off shape above. If anything sits in front of this
instance, Traefik, nginx, Caddy, an ingress controller, Cloudflare, set
OTB_TRUSTED_PROXIES so the server can tell which request came from which
person.
(In auto and internal you do not need to: Caddy runs inside this same
container on loopback, the app binds loopback only, and the server trusts that
one hop by itself. Setting it explicitly still wins.) It is unset by default, meaning nothing is
trusted, because a server that believes a forwarded header when there is no
proxy in front of it believes whatever a caller claims.
-e OTB_TRUSTED_PROXIES=uniquelocal # a proxy on your own private network -e OTB_TRUSTED_PROXIES=172.18.0.0/16 # a Docker bridge network, most precise -e OTB_TRUSTED_PROXIES=2 # two hops, e.g. Cloudflare in front of TraefikAccepted values: off (the default), a number of hops to trust, a
comma-separated list of addresses or CIDR ranges, the named presets loopback
/ linklocal / uniquelocal, or true to trust every hop, which is only
safe on a network you fully control. A value the server does not recognise
fails the boot with a message naming the alternatives, rather than quietly
becoming a security posture nobody chose.
What goes wrong without it. Sign-in rate limiting buckets by client address. With nothing trusted and a proxy in front, every request appears to come from the proxy, so one person’s mistyped password can throttle sign-in for everybody on the instance. The boot log prints which setting is in effect, so you can confirm the posture you intended is the posture you got.
Where the data lives
Section titled “Where the data lives”Data lives in app.db under /app/packages/server/data inside the container,
along with the installed licence file. Mount that directory as a volume, as
above, so it survives a container restart. Back up the whole volume, not only app.db.
That volume is also what carries this deployment’s instance id, which a licence is issued against. Keep it, and a rebuilt container is the same deployment and keeps its licence. Lose it, and you will need a replacement licence issued against the new id.
Migrations run themselves
Section titled “Migrations run themselves”Numbered SQL migrations are applied
automatically, in order, on server boot, there is no separate “run migrations”
step you need to remember for a normal upgrade. A migration that finds the
database in a state it can’t safely proceed from refuses the whole boot,
loudly, naming exactly what’s wrong, rather than silently skipping itself or
leaving the schema half-changed. One example: migration 0031 refuses to run if any sign-in account has no linked
person, and names every affected account’s email in the error, see
When things go wrong.
Upgrading
Section titled “Upgrading”There are two kinds of upgrade, and the Updates screen tells you which one each release is:
- An application update, which you apply yourself, here, in a minute or two, with nobody else involved. This is the normal case.
- An image switch, for a release that changes something outside OTB Works’ own code, a dependency with a compiled component, the version of Node, or the base operating system whose security updates only arrive when the image is rebuilt. Somebody with access to the host has to pull and redeploy.
Underneath both, there are two ways the signed release information reaches your instance, it fetches it, or you bring it as a file, and they differ in that one step only. Everything about verification is identical either way, and an instance with no route out is not in a degraded mode.
If this instance can reach OTB
Section titled “If this instance can reach OTB”1. Turn the check on, once. Admin → Updates → Check OTB’s public release feed on a schedule. The screen states exactly what a check sends before you agree to it (an anonymous GET of six public files; nothing about your deployment). It is off until you switch it on, and it can be switched off again at any time, including from a file on your data volume, on an instance you cannot sign in to.
2. You are told. When OTB publishes, the screen says “1.1.0 is available” on its own, and lists the release with what it means for this instance, installable, or withdrawn, or too far ahead to jump to directly, each with the reason. Nothing is hidden for failing a check.
3. Pull the image and stage it. This is the step below that is the same on both paths.
If this instance cannot, or may not, reach OTB
Section titled “If this instance cannot, or may not, reach OTB”1. Download one file, on any machine with internet access:
https://updates.outsidethebox.works/update-bundle.jsonAdmin → Updates has a Download the release file button that opens exactly that address, and prints the address itself for a machine that is not this one. It is a few kilobytes, the signed list of what OTB has published, with the signing key list and the revocation list, not the software. It does not matter how it reaches you or who carried it: it is signed data, and your instance checks all of it.
2. Upload it. Admin → Updates → Choose bundle file… → Verify this bundle. (There is a paste box too, for a terminal-only copy.) Your instance checks the whole chain offline against the root key baked into its own image: root → key list → manifest signature → revocation list → digest → whether each release applies here.
3. Pull the image and stage it, exactly as below.
Applying an update yourself, without touching the container
Section titled “Applying an update yourself, without touching the container”This is the path that exists because the person who uses OTB Works and the person who runs the container are usually not the same person, and a ticket takes three weeks. An application update carries OTB Works’ own compiled code and its database changes, about four megabytes, and nothing else. It cannot carry a dependency with a compiled component, or Node, or the operating system’s security patches, and a release that changes any of those declares itself as needing the image instead.
Admin → Updates leads with the answer to the only question that matters first: is this one yours to do?
1. Make sure the instance knows what OTB has published. Either it checks the feed itself (above), or you bring the release file (above). Either way the screen then names the next release and says whether it can be applied here.
2. Check this instance is ready. Press Check this instance is ready. It lists, by name: that the instance can verify an OTB release at all; that its database has not already been migrated by something newer; that this is the next release in order; that the licence allows it; that there is room for the update, its unpacked copy and a full database backup; that the backup can actually be written; that the update can be obtained; and that nothing else is part-way through. One failure stops the update, there is no “mostly ready”.
3. Get the update itself. If this instance checks the feed, press
Download and apply and it fetches the file for you. If it does not,
download the release’s app-bundle.tar.gz from the same place you got
the release file and choose it here. Either way your instance hashes what
it received and compares it to the digest inside the manifest OTB signed
, a real comparison it makes on its own, with nobody to mistype
anything. A file that is not what OTB signed is refused and not kept.
4. Apply it. The instance holds everybody else out of writing for a minute or two, takes a full database backup, unpacks the update, and restarts itself onto it. The page you are on waits and comes back on the new version by itself; you do not reload anything.
If it does not come up, the instance puts the previous version back on the next start, restores the database backup it took beforehand, and says so on this screen. You do not have to be there for that to happen, and it does not depend on how your container’s restart policy is configured.
Going back on purpose is one press: the previous version is still on the data volume, so Go back to… is a restart rather than a download. That does not restore the database, anything saved since is real work , so if the older version cannot read the newer schema it will say so loudly at startup rather than run against it.
Updates are applied one at a time, in order. If you are on 1.4.0 and 1.5.0 and 1.6.0 exist, you take 1.5.0 first. Each one then gets its own backup and its own chance to be seen working. If the next one in line needs the image replaced, the screen says so and names the digest for whoever runs your container, you cannot step around it, because doing so would leave this instance running new application code on an operating system that never took that release’s patches.
Holding people out by hand. Applying an update switches maintenance
mode on and the successful restart switches it off again, so on the
ordinary path you never touch it. The switch on the same screen is there
for the other times: while it is on, everybody can still read and nobody
can change anything, and it lapses on its own after half an hour so an
instance is never left switched off by accident. If you are ever locked
out by it, deleting maintenance.json from the data volume ends it.
Which releases you can take yourself
Section titled “Which releases you can take yourself”Every release says whether it needs the container image replaced, and the Updates screen marks the ones that do. It matters because it decides who has to act:
- Needs the image replaced. The release changes something that lives outside OTB Works’ own code, a dependency with a compiled component, the version of Node, or the base operating system whose security updates only arrive when the image is rebuilt. Somebody with access to the host has to pull and redeploy.
- Everything else. Nothing outside the application itself changed.
The flag is worked out at release time from the release’s own dependency lockfile and base-image digests, not from somebody remembering to tick a box, and a release nobody can answer for is marked as needing the image, never as not.
Two version numbers, and why both matter
Section titled “Two version numbers, and why both matter”Admin → Updates shows Application version and Platform image built, and they answer different questions.
The application version is what OTB Works is. The platform date is how current the operating system underneath it is: base-OS security patches are applied when the image is built, so an image is exactly as patched as the day it was made, however new the application version on top of it is. Past ninety days the screen says so and asks for the image to be pulled, whatever the application version says. If you read one number, read both.
Replacing the image, the releases that need it
Section titled “Replacing the image, the releases that need it”Pull the image and stage. You supply the digest of the image you have actually pulled, not one the screen filled in for you, which would be a check comparing a value to itself:
docker pull ghcr.io/outsidethebox-io/otb-works@sha256:<digest>docker images --digests | grep otb-worksThe image is a few hundred megabytes and comes straight from the registry to your host. It never passes through OTB Works itself, in either direction, that is what keeps a web application unable to replace its own container.
Paste that digest and press Stage upgrade. Staging changes nothing about the running instance; it records what you intend, and prints the exact command to run. A digest that is not the one OTB signed is refused here, before anything is deployed.
Swap the image. This is the only privileged act, and it is yours:
point your compose file (or deployment) at the digest the screen names ,
a digest, never a tag, and docker compose up -d.
The new image finishes the job itself. On its first start it
re-verifies the staged release offline (it does not take your word for
what you deployed, any more than you took OTB’s), backs the database up,
runs the migrations, and commits. If anything fails it restores the
backup and refuses to start, put the previous image back and it
boots on a database it never stopped understanding. The docker logs
line at startup names the version now running, and Admin → Updates keeps
the account of every staging, refusal, cancellation and application.
Going back to an earlier version is the same flow aimed at an older
release, see release/docs/ROLLBACK.md for the one extra check that
applies.
To confirm an image is genuine outside the product entirely, a security
team’s own check, with nothing but Node and the files, see
release/docs/VERIFYING-A-RELEASE.md.
If your licence has lapsed
Section titled “If your licence has lapsed”A lapsed or withdrawn licence puts the instance in read-only mode, and you can still install a security fix, including applying one yourself as an application update, which is the only kind of upgrade you can complete without help. Patching the line you are already on is not a feature you can fail to have bought, and “your licence lapsed, so you may not apply our security fix” is not something this product will say. Any other release is refused, by name, until the licence is back in force.
Finding out that a new version exists
Section titled “Finding out that a new version exists”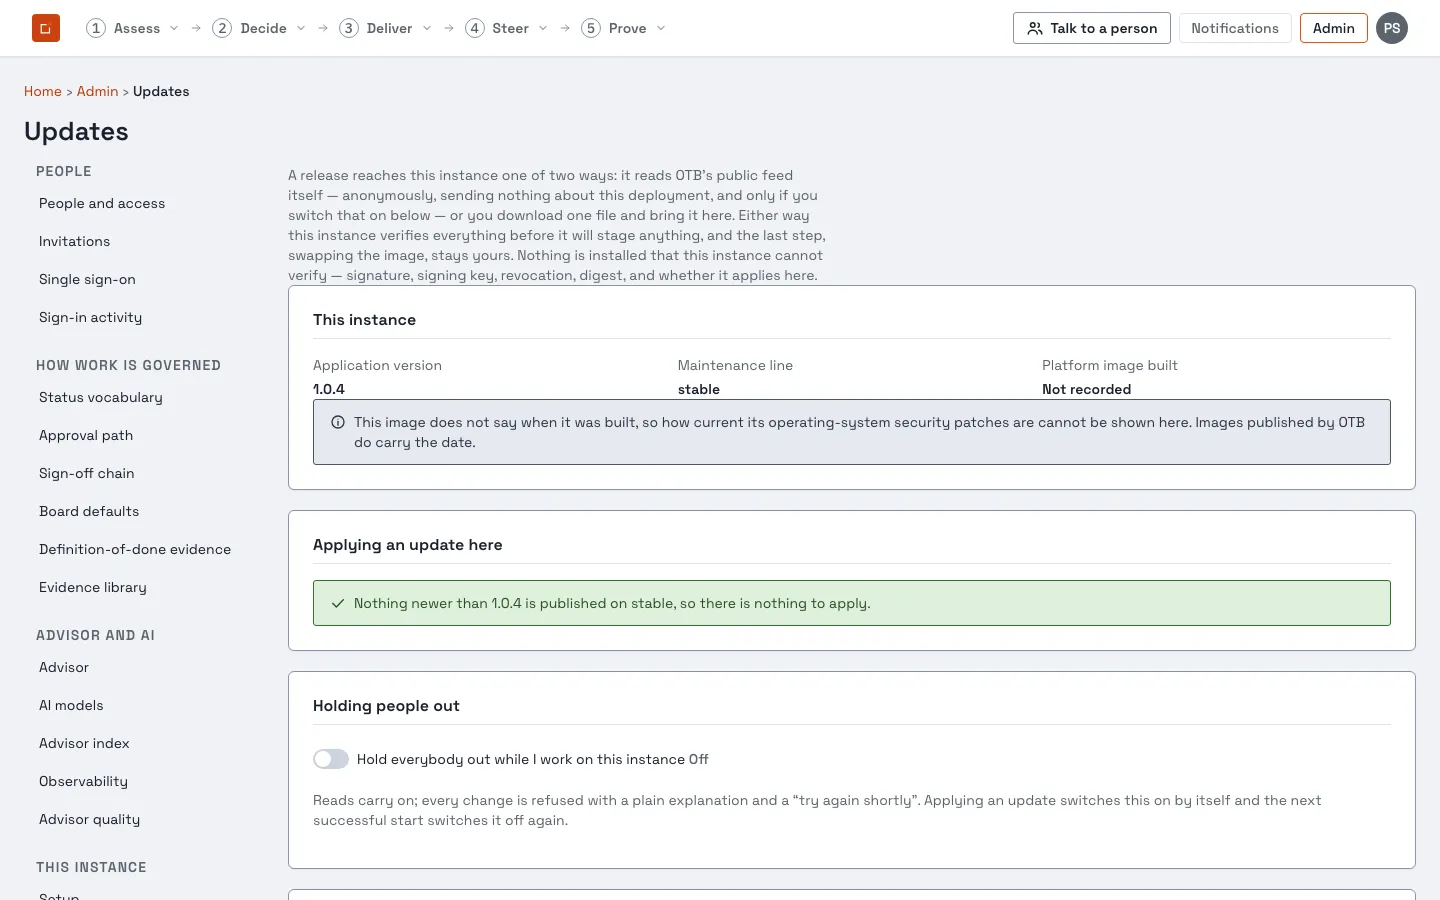
By default, this instance never contacts OTB about anything, which also means nobody here is told when a new version is published, including a security fix. Admin ▸ Updates says so plainly rather than leaving you to find out.
Two ways to change that, and neither one reports anything about your deployment to us:
- Bring the release yourself. Download the one signed file ,
https://updates.outsidethebox.works/update-bundle.json, or the button on that screen, on a machine that has network access, or receive it through your change process on media, and upload it. This is the only path an air-gapped instance has, and nothing about verification differs. - Let this instance read the feed. Switch on “Check OTB’s public release feed on a schedule”. The instance then makes an ordinary anonymous HTTPS GET for five public files, every six hours at a varied moment.
What that check sends is written out on the screen itself, and is exactly this: an HTTP GET, and the public IP address any web request carries. No instance id, licence id or customer name; no version, edition, module list or user count; no usage, telemetry, error reports or logs; no credentials or cookies. It is the same shape as a package manager checking a repository, and nothing fetched is trusted because of where it came from , every file is verified against the OTB root key baked into your image before a word of it is believed.
Turn it off and it is off. The setting also lives in
update-feed.json on your data volume, so you can set "enabled": false
there on an instance you cannot sign in to, and an unreadable file is treated
as “off” rather than “on”.
What checking changes about your licence
Section titled “What checking changes about your licence”One thing worth knowing before you decide, because it cuts both ways.
If OTB withdraws a licence, a mis-issued one, or one being used on more deployments than were bought, an instance that is checking stops honouring it within the check interval, and drops to read-only with an explanation. An instance that is not checking will keep running on that licence until its own expiry date, which can be up to about thirteen months away. That is a real difference and we would rather you knew it from this page than from a conversation.
Signing in
Section titled “Signing in”Every account signs in with an email and password, and can additionally enrol a passkey (a fingerprint reader, face unlock or device PIN), the setup wizard offers one immediately after creating the administrator, which is the easiest moment to do it, and Account › Security offers it at any time afterwards.
Single sign-on is available. OpenID Connect and SAML 2.0 are both supported, as a service provider (this product federates to your identity provider; it is never an identity provider itself). Register one from Admin › Single sign-on, or during first run, the wizard’s last step offers OIDC inline. A provider must pass a real connection test before it can be turned on, so a sign-in button never appears on the front door leading nowhere.
An SSO sign-in auto-provisions the account but never the person: somebody your programme has no record of is turned away by name, rather than silently given access.
What happens when someone gets a password wrong
Section titled “What happens when someone gets a password wrong”A failed sign-in never says whether the email or the password was the wrong
half, always the same generic message (Invalid email or password), and the
same message for an address that has no account here at all.
Two separate controls then apply, and it is worth knowing which does what.
Per client address. Three attempts in a rolling ten seconds from one
address are refused (HTTP 429 with a stated wait), never a silent hang. This
stops one noisy client. If this instance sits behind a reverse proxy, set
OTB_TRUSTED_PROXIES (above), without it the instance cannot tell one caller
from another, and this control applies to everybody at once, so one person’s
mistyped password throttles your whole team.
Per email address. This is the one that matters against a real attack. After four wrong passwords for the same address, the fifth still gets an honest answer but starts a wait before another password will be checked for that address: 30 seconds, then 1, 2, 4, 8 minutes, up to a ceiling of 15 minutes. It does not matter how many different computers the attempts come from, the wait belongs to the address being attacked, not to whoever is attacking it. At the ceiling that is four guesses an hour, which is not an attack any more.
Nobody is ever locked out. This is a wait, not a lockout, and the difference is deliberate: an attacker who could lock your administrator out would not need to guess a password at all to ruin your morning. Specifically:
- The account is untouched. Nothing is disabled, nothing needs unlocking, and no administrator has to do anything.
- Only the password route waits. A passkey, single sign-on and an emailed sign-in link all still work immediately. An attacker cannot make those fail, which is exactly why they stay open. If your administrators do one thing on the strength of this page, enrol a passkey.
- Resetting the password works straight away and clears the wait, which is what the sign-in screen offers when it refuses.
- Signing in successfully, by any method, clears the wait for that address.
- Waits expire on their own, and an address nothing has failed against for a day is forgotten entirely.
Seeing it. Admin › Sign-in activity shows what has been signing in, what has failed, and which addresses are being made to wait right now, including the number of attempts turned away, which is what tells one person’s bad morning apart from a botnet. Addresses with no account here are recorded too, and shown as such; that is deliberate, because a record that quietly skipped them would tell an attacker which addresses exist.